Wednesday, September 29, 2010

Leonardo is Done! And Another Scarf is Started

Homage to Leonardo

Yea! After what seems like forever, the Homage to Leonardo mosaicon is finished!  I'm very pleased with it. It turned out to be a tour de force of technique. Most of the tiles are done in Premo clay, stamped and highlighted with mica powser - Pearl Ex Sunset Gold, to be precise. Many are beaded, which is always fun. Some are done in Sculpey Original in terra cotta and highlighted.  Some are done in the terra cotta and painted with Venetian Gold paint. The frame and some of the tiles are done in Premo copper, stamped and highlighted.  Two are image transfers of Leonardo da Vinci's work.  One is of his self-portrait and the other of the Madonna of the Yarnwinder (see below). Two are done in Premo gold, mica shift technique with a stamp. I carefully shaved away the raised part of the pattern.  The crown was tonight's learning experience - chatoyant in gold Premo. I did a snail shell and shaved thin bits from the shell.  Then I layered them onto a base rectangle of gold clay and rolled them in. Lastly, I cut the rectangle into the crown shape and baked it. Tonight, this is my favorite tile.


Stones and Waves Narrow Scarf
And I started yet another scarf.  This is strange for someone who hasn't much worn scarves. But the yarn for this one just called to me.  The green is Frabjeous Fiber's Banana Silk in a lucious green the turquoise is Mango Moon's Chakra in Turquoise.  This is the scarf I wish I'd made before!

Yesterday was emotionally trying.  I discovered what it's like to be involved in a campus shooting. Neither I nor anybody I'm close to was immediately involved, but being there and being present was difficult. Giving what help and support I could via text message... well... it works.  I'm amazed at the technology and how it helps.  I do want to thank the University police and city police as well as the other agencies involved for responding so quickly and keeping the other kids safe. I cry when I think of the young man who saw no other way out than to end his life in that dramatic fashion.  Where have we failed him?  If it truly does take a village to raise a child, how did the village fail him? I cannot imagine the agony of his parents now. There can be nothing worse than losing a child.  Within a month I've seen two mothers lose their children and a woman lose her husband. There is no answer to why, I don't think. There is only the lesson to value what we have when we have it and give thanks every minute while our loved ones are with us.  That was the lesson I took away from the Columbine shootings and it's only been reinforced with recent events.

Thursday, September 23, 2010

More Mosaicons

After completing the anniversary mosaicon, I decided to start on one for myself. Two ideas were in hot competition with neither one willing to give way to the other.  So in my usual over-the-top fashion, I decided to do them both.  The first is a piece based on Leonardo da Vinci's Study for Leda and the Swan. The most complete drawing, which wasn't used in the study for the finished piece, is one of my favorites of all his known work. Fortunately, it's in the Dover daVinci collection, so I was able to use it as the focal point of this piece.  It doesn't hurt that I'm reading Fritjof Capra's The Science of Leonardo. The book is probably not Capra's best work, but I'm learning about da Vinci, and that's a good thing.


Homage to Leonardo
I've chosen to limit the palette for this piece to terra cotta and gold.  Because da Vinci frequently drew in red chalk, I thought the terra cotta would be a good choice. I have a stamp of a drawing and notes from his notebooks.  I made a mold of it so the writing and drawing would be raised.  In retrospect, I'm going to try doing a straight stamp and see how that looks.

I also tried doing a print transfer to tile.  Overall, it works pretty well, with a few surprises.  I think I'm just not master of the technique yet.  One of the transfers is of da Vinci's self-portrait.  The other is a detail from my favorite of his finished works, The Madonna of the Yarnwinder - or as I disrespectfully term it, the Niddy-Noddy Madonna.  I tried transferring both to terra cotta tiles.  They both worked fine, but I'm not satisfied with the colors.  Next up was transferring to white tiles.  Better, and I may use these.  But I'm going to try transferring to pearlized tiles.  Comparison photos I've seen show this as the best way to do it.


My First Cane
And I made my first cane for this piece!  Laurie Mika doesn't mention making canes in her book, although I suspect she may do so.  I wasn't all that gaga about the idea at first, but I can see where they open up possibilities that can't be done any other way.  Today's project was making pearl and gold checkerboard tiles for the da Vinci project.  They're not perfectly even and straight, but I love 'em anyway!


The Huntress
The next piece is based on an image I adore - Diana using the crescent moon as her bow. It's my favorite image from Disney's Fantasia and I was so lucky to find a similar image in some ephemera I recently acquired. In the process of researching the Goddess and the image, I discovered that Disney issued a pin of her in March.  I couldn't get the pin directly from them, but I did win one on e-Bay, the arrival of which I'm eagerly anticipating.

The ideas for the tiles haven't come quite so fast on this piece - or rather, I've had setbacks on this one that have slowed me down.  The large frame that goes around the recessed image was done in blue clay with the inner part highlighted in silver and the outside highlighted in gold.  I made a first version along with two random tiles and baked them as I always have.  They came out black.  The only thing I can think of is that I burned the clay.  I was so disappointed I almost quit.  But I tried a second time and it came out right, which reinforces my belief that I overcooked the original set.  Thus far, my favorite bit was using a small face mold I have to make a full moon from pearl clay.  I highlighted the eyes and lips with interference gold, which came out better than I dared hope. I'll get back to this one soon.

Thursday, September 16, 2010

Mosaics and Icons - Always and Forever

Always and Forever

Yesterday I finished my first mosaic icon - or "mosaicon," as Laurie Mika terms it in her book. I set out to make the icon as an anniversary present for a friend and her husband. They had only been married a short time when he was diagnosed with advanced cancer. I started on the icon knowing he was dying, but hoping I could finish it in time for him to see it.  I didn't make it, as he died last week.  It should get there in time for his memorial service.

A little over half the tiles in the piece were hand made in polymer clay.  The milagros in the tiles were purchased at our local market as was the Sacred Heart piece at the top and the large painted tile at the bottom. Many of the tiles are representational.  One was made after being told a story about his last days.

The rose pictured in the center of the piece is a Photoshop Wonder. I didn't want the photo around which the piece is built to be seen publically.

As difficult as this piece was to make, and it was, I adore this art form. I was crazy for making my first piece in an unknown medium as a gift for someone in a difficult time.  It kind of ups the ante, as it were. But difficult as it was, if it gives any sort of meaning or peace, then I've accomplished what I set out to do.

Now the this piece is finished I'm looking forward to the next one. In the next month or so, I need to do a piece for Dia de los Muertos (Day of the Dead).  Our store here will display the pieces and I'd like to participate. Before then, I'm up between a piece honoring Artemis and one centered around Leonardo da Vinci's Study for Leda and the Swan.  I'm further down the road on the da Vinci piece as I have some terra cotta and gold tiles finished. We'll just have to see what happens next!

Tuesday, September 14, 2010

Adding Art

Okay, so maybe I've regressed to childhood.  I play with dolls.  I've re-discovered the joys of cutting paper apart and pasting it back together.  And why do we ever stop making mud-pies??  Oh, the beauty of trading cards!  In other words, I've found a way to sneak up on the visual arts and am having the most fun. Mostly.

It all really started last spring with the graduation scrapbook for my youngest. Said scrapbook still isn't made, of course, but that's where it started. For reasons I can't even remember, I decided to wander into the local rubber stamp store. They had just moved to their new location and weren't totally set up for business, but off in a corner was a sample book made of 4" by 4" coasters and mixed media.  Beside the sample were kits for the book. I fell in love, snatched up one of the kits and headed for the cash register. I was somewhat discouraged from buying the kit as it had been a class kit and the class was long past. Nobody in the store knew how to make it up.  So I bought it anyway.  For several weeks I'd pull it out, spread the contents over my desk, look at it, get overwhelmed and put it away.  Then I finally started work. Oh, I did it my way... which means I mis-read the instructions and did a page or two in a way that made sense to me. These are some of my favorite pages, needless to say. I had to learn to emboss metal, dye it with alcohol inks. paint on paper with alcohol inks and distress / age photos and papers. And I began my battle with adhesives.

It was easier in kindergarten. You used Elmer's school paste and that was that.  Now there's a bewildering array of glues, pastes, tape runners, etc. just waiting to... ahem... entrap the unwary. For scrapbooking, I prefer a repositionable tape runner. So heading off to mixed media, I simply bought the permanent version of the same thing. Sigh. There's sticky and then there's hopelessly stuck.  Zero open time, zip repositionablity and the dispenser gunks up hopelessly slightly before the end of the tape roll. It's one of the few things I'll allow my husband to clean - he whose first level cleaner of choice is rubbing alcohol. And then when you think it's stuck, you're stuck with corners that come unstuck.  Liquid glues cause paper to buckle and curl. Pastes remind me of kindergarten. Glue sticks don't stick. What's a girl to do? I did eventually find an answer - YES! paste, slightly doctored.

Then there are cutters.  Did you know it's impossible to find a cutter that actually cuts at perfect right angles? Which reminds me of my brother's lack of concern with level. How can something be level when you're standing on a ball? Probably the same thing with right-angle cutters. I did find the perfect pair of scissors - the "remove 'em from my art table and die" scissors. Add an Xacto knife, clay blade, dull table knife and you're probably there.

Anyway, after trial, tribulation, and lots of fun, I completed the book - Divas from Gecko Galz. And fell in love. While working on that book, I came up with ideas for five or six more, one of which I made and others still waiting in the wings. Up next was a book celebrating two decades of friendship - a gift to my best friend.

Friends

I collected friendship quotes from the internet and raided my stash for images of friends. The book took a while to come together, but not terribly long.  As usual, if I had it to do over, I would have done some things differently.  If that ever changes, I'll stop making things. It was a wildly successful gift, for which I'm grateful and should hopefully be featured in a technique book somewhere down the line.

The Birthday Book

Next up was a book celebrating my son's 23rd birthday. This was an exercise in Steampunk, something I'm really getting to enjoy. I collected images of him through his life doing Steampunk-y things - his early infatuation with trains, his "magic show" at the Hotel del Coronado in San Diego, his animated "float" for the shoebox Fiesta parade. It was such fun giving him both this book and my husband's Steampunk Birthday Card - weighing in at five pounds made of metal, gears, pipes, gauges and valves.  Did I mention SuperGlue and epoxy are his adhesives of choice? That and welding...

During one of my many visits to Stamp Antonio, I noticed two things that grabbed me. One was a display advertising an upcoming class, the other was the flyer announcing the themes for the ATC group. First I had to learn what an ATC was. Enter, stage left, the return of trading cards!  Artist Trading Cards (ATC's) are trading card-size pieces of artwork intended to be traded, never sold, and to convey something of an artist's style. They can be traded for the joy of it, or can be used as business cards. I casually mentioned that I might like to participate some time and, wham!  I found myself signed up for September's swap, both themes.

So to get started, I made my son an ATC to tuck into a pocket I hadn't realized needed to be in his book. That went okay, so I decided to stay signed up for both ATC themes.  The first was Black and White, a theme I almost dropped out of.  The second was Ancient Civilizations and Cultures.  I thought number 2 would be a shoe-in.  Silly me.  The Black-and-White idea came easily, although the execution took a bit of trial and error. Maybe what helped was a rant to my daughter by her father. His typical theme when running me down is "black is black and white is white and right is right and wrong is wrong."  Black is black and white is white, eh?  Don't we all wish life were that simple. So what are they... and here came a thought from a long-forgotten and not-loved philosophy class... but points on a continuum?  Hmm...  So I incorporated that idea, chess, and the yin/yang symbol and here we are:

Points on a Continuum

The Ancient Civ theme took forever, but it finally came, too. Ancient Greece?  Rome??  Egypt?  In the total history of the human race, they're yesterday. I thought of the stories I've told and how the same stories appear across cultures.  Where did they come from? Tales around a campfire? I think reading Gene Kranz's Failure Is Not An Option may have gotten me thinking about the stars and the stories people tell. Did you know Orion is the oldest recorded constellation in its current configuration? It was called the Shepherd by the Sumarians in the earliest records we have of star-stories.  So I took a star chart of Orion and built a card around him.
We Were First

The colors actually are much richer than show in this photo. The card is in its protective sleeve which dulls it somewhat.

And the next adventure? That class that I, sadly, didn't get to take. Building small shrines from polymer clay tiles. I couldn't take the class since we were busy moving my daughter to college that weekend, but I snatched up the book and started on my own.

And that's a story for another day.

Sunday, August 29, 2010

More Dolls and Kids in College

Whew! Just finding time to breathe is a chore these days. Physically, I'm seeing symptoms that I need to slow down and regroup.  But the youngest is now in college. She and I are dealing with the separation anxiety - maybe she's dealing better than I am.  It's hard to tell. I'm finding ways to move on with my life and that's helping. I always intended that when my major child-rearing years were over, that I would branch out, learn new things, go new places. I'm starting now.


Katisha and the BJD Convention
I attended my first ever BJD (Ball-Jointed Doll) convention a few weeks ago. I was fortunate enough to meet Paulette Goodreau, the designer of my 2 MSD (1/4 size) dolls. I bought a new doll and some outfits from her. While wandering the sales floor, looking for a wig for the Goodreau doll, I chanced upon this beautiful ResinSoul Dai repaint. She came home with me to join my Elfdoll RuRu SD (1/3 size). I love the name of the antagonist in The Mikado, Katisha, although, of course, I don't love the character! So I named this doll for her, but changed the pronounciation from "KAH-ti-sha" to "ka-TISH-ah".  But she's still Kat for short. I've since changed eyes and wig on her.  I need more photos!


Raja and Her Tiger
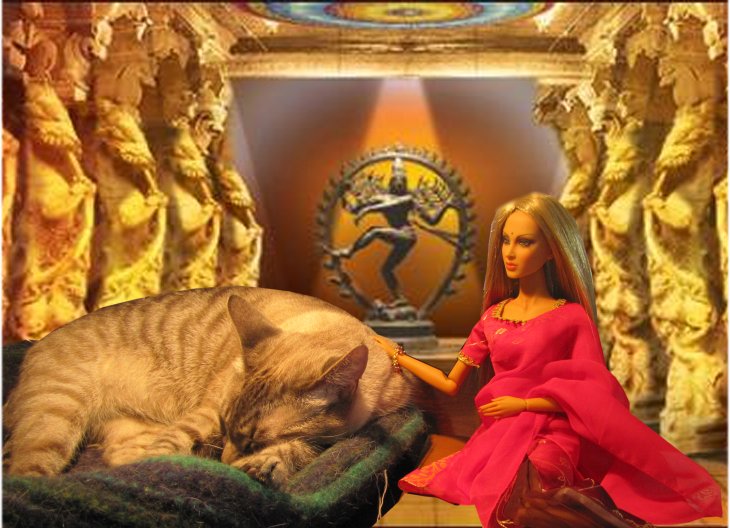
Not too long after acquiring Sanctuary, the Sybarite in the posts below, I acquired yet another beautiful Syb - Raja. I've had such fun dressing and photographing her. First is her in a photo my husband worked on. I brought her downstairs from the studio to my computer to upload photos I'd taken. I wasn't pleased with any of them, really. Ming was asleep in his bed and I got a crazy idea to see if he would allow me to pose her beside him. Suprisingly enough, he did - he must have been very asleep!  One of my doll board friends titled this shot "Tiger, tiger in the night" and another captioned it "Be still, my pet. Mama's thinking..."  I love them both!

I made a second version of the dress featured in the post below: the dress made from an article in FDQ (Fashion Doll Quarterly) about drafting patterns from vintage fashion photographs and drawings. I loved the resulting dress, but decided to alter it and make it more exotic for Raja.  Here's Raja in a red wig modeling the result:


I finally acquired a black wig for her.  Again, I need to have another photo session with the dolls!

I think I'll close this post now, but post again soon. The art world finally opened up to me! It's been a long journey - too long in coming, actually, but I couldn't be more pleased!

Saturday, July 17, 2010

Hanging Out With the Dolls

I've had an interesting journey with dolls. I have more now than I had when I was a child!  (I think...) Definitely more fashion dolls. When I was a girl, I had baby dolls and girl dolls and a few of the requisite Barbies. My favoite was a tall, skinny, redhead who wore glasses, saddle shoes, and talked incessently. That would be Mattel's Charmin' Chatty. But when I grew up and gave away my dolls, the only girl doll I kept for my own daughter was one of the last dolls I received as a child, Baby First Step, not Charmin'.

By a long road that started when my grandmother died and I inherited the cedar chest containing my mother's favorite doll, I've learned about doll restoration, costuming and collecting. It's been an interesting road that's led me to collecting fashion dolls. Although I love the stage and love to act, I think I may have missed my calling as a costumer designer. I'm not the best seamstress in the world, but I love to design. I haven't yet had the courage to take needle in hand and design for my dolls, but I'm feeling the urge coming.

In the meantime, I'm learning to photograph my dolls, which is an adventure in itself. I've taken three photos this week that I think might do. The first photo is of my new-to-me Superfrock Sanctuary doll in a gorgeous black dress.

She almost looks real, doesn't she? The second photo is of a resin fashion doll with interchangable eyes. (This may be why my daughter says my dolls are "creepy!") This is Jamie, an Angelic Dreamz JamieShow doll wearing a gorgeous blue outfit.

The last of the three is more than a photograph. I saw the pattern for the dress in a doll magazine last fall. The article dealt with using vintage fashion photographs as inspiration for doll clothes. I decided this week to make the dress up to see if I could. There are things I'd change next time I make it, and I'd have to redraft it for a certain doll I have in mind, but yes, I can do it. The doll is a Glowing Muse doll from Robert Tonner.


So why do we collect? And why do we play with dolls? I may be answering that question for quite some time. One of my doll friends likes to collect extreme fashion dolls because the dolls can let her enjoy daring fashions she wouldn't / couldn't wear herself. Dolls let me enjoy (or get frustrated with, depending) creating fashions in rich fabrics that I couldn't afford if I were making full-size clothes. The seams are still too darn small, but I'm getting the hang of it. They let us escape for a little while into fantasy worlds. They let us try out things we couldn't do in real life.

And yes, I found a red-headed Charmin' Chatty on eBay. She lives with me now. I've collected records for her - she can still talk. I've made replacment clothes for her wardrobe and designed her a few things myself. After the 16" fashion dolls (bigger than Barbie, at least), sewing for a 22" doll is a joy! I found her an original pair of glasses. She sits on a dresser in a display of family dolls. Baby First Step is there - my daughter never did play with her. My mother's doll is there. My daughter's favorite doll is there.

Monday, June 7, 2010

Phinally Phinished Phelted Clogs (and other stuff)

Yea! They're finished! I got George's Phelted Clogs felted and they did beautifully. That's entirely by the Grace of God because I put them in the washing machine and forgot about them while I got interested in scrapbooking.  Yikes! I'm amazed they didn't turn out small enough for our youngest grandchild. But when I finally yanked them out of the washing machine, I shaped them just a bit and put them on George's feet. He's a brave man and wore them wet for almost eight hours. Although he had prune feet by the end, the clogs formed to fit his feet perfectly, and he's very happy with them. So am I!


The Once and Future Socks
I got another pair of socks finished. These poor things have been in progress for years - probably since 2006 or so. They're in Mountain Colors' Yellowstone colorway, which I adore. I started making them in the Diana's Trail Sock pattern, also by Mountain Colors. I've made lots of pairs of these socks, some for me, some for George and some for friends. They fit me fairly well, but always seeem a bit too big. I made one pair on 2.25mm needles instead of 3.0, which seemed to fix quite a few problems. However, the heel seemed too big or something, but I figured I'd just have to live with the heel. I started these one sock at a time on five double-pointed needles. Somewhere along the way, I learned to knit on two circular needles instead of the double-points. Then I discovered the joys of knitting both socks at the same time so that when I finish, I'm done. THEN I discovered Cat Bordhi's New Pathways for Sock Knitters book and made a pair from the first pattern. Hmm.... Then I got to thinking what would happen if I did the cuff from the Diana pattern, the arch expansion and heel from the New Pathways book, ribbed the instep as I learned from somewhere, but I can't even remember where now, and finally, did both socks at the same time!  So I ripped the heel back on the one sock, then set it aside while I knitted the second sock up to the end of the cuff, did the arch expansion and heel in both socks according to the New Pathways pattern and started down the foot. Somewhere about halfway down the foot I learned to knit socks by the Magic Loop method, so I put the socks on a longer 2.25 needle and finally, finally finished them this past weekend! They fit like a dream and the combined pattern is a winner. I just might have to do another pair the same way!

Celtic Braid Socks
I settled on the Riverbed Sockitecture from the New Pathways book for the arch expansion of the upside down (toe-up) Celtic Braid socks. I started the expansion today and we'll see how it goes. At the moment, they are one boring pair of socks, but if I can only get the foot and heel done, they'll get exciting soon enough.

Gale-Force Winds
We survived the huge storm last week. We were without power for several hours, but nothing like many people in town who had no power for almost 24 hours. There are leaves and small tree-bits down all over the yard, but I don't think we suffered much damage. At least I didn't think so. We've had the most interesting thing happen since. We've had an invasion of flies in the house. I've never seen such a thing. They arrived after the storm and we've spent quite a bit of energy removing them without using nasty chemicals. I think we may finally have the upper hand, but how strange!