Tuesday, January 11, 2011

The Sabina Weaves Again

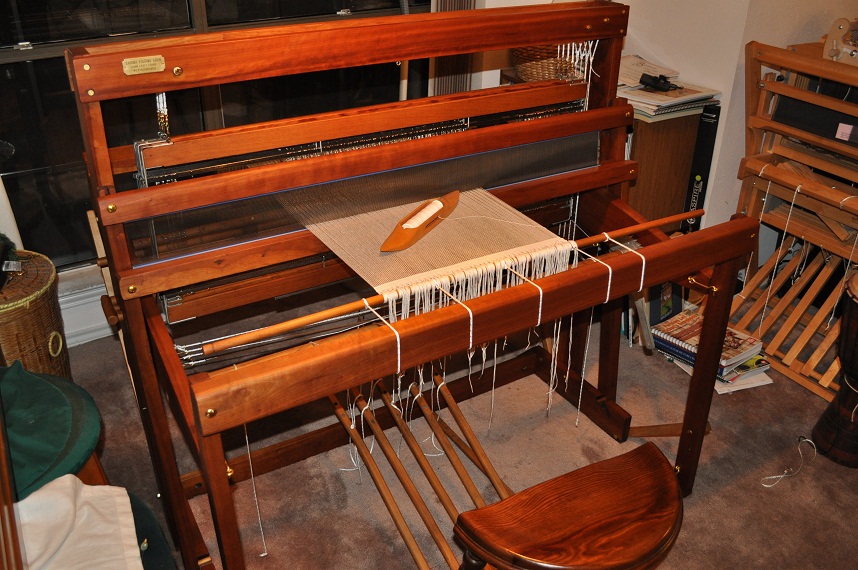
It took me two days, which is actually something of a record for me, to warp the Budget Bamboo Shawl onto the newly restored Sabina loom.  The shawl project was featured in the November/December 2009 issue of Handwoven magazine.  Made from Aunt Lydia's Bamboo Crochet Thread, it's an inexpensive project with a beautiful hand and and elegant look.  I had measured out about a third of the warp and  sleyed it into the 36" Schacht Standard 4-harness loom. For some reason - probably my dislike of warping - I abandoned the project. I forgot to knot the sleyed warp. I should know better.

When the kittens came to live with us, they quickly found the unprotected warp.  One morning I woke to find all of it on the floor below the loom. Bad kitties! I thought about trashing the warp, but decided to carefully stabilize it and put it aside. I brought it out again to warp onto the Sabina. It took a little combing and straightening to get the tangles out, but I got it successfully warped onto the Sabina along with the rest of the threads.

Lace Shawl warped onto the Sabina
Once I got going, threading and tying up the loom really didn't take all that long.  The lace is a  rhythmic pattern that's easy to learn.  The only downside is that every other thread must thread into the first harness, so you can group no more than two threads at a time to thread.  In, for example, a twill, you can group four threads at a time.

I have to admit, I was tentative throwing the first shots to spread the warp. I guess I was afraid the old loom would shatter into pieces or something. The fishing swivels we used for connecting the tie-up cords to the harness cords did have some problems.  The one controlling the first harness - the one with half of the warp threads, did break.  I don't know if it was under too much pressure or if it was weak, but break it did.  It's rather dramatic when you have a harness raised and you hear a POP and it suddenly drops.  But we replaced the swivel and, thus far, the new one seems to be working okay.

Starting the Shawl
The shawl is woven in blocks of Atwater-Bronson lace, a loom-controlled openwork weave. The designer planned alternating blocks of lace, but liked the center and two border blocks in lace, separated by tabby blocks so much that she wove the entire shawl that way. I chose to weave four repeats that way, four repeats of the lace/tabby blocks reversed, and then weave the shawl in the original configuration until the end when I'll repeat the reverse/original border.

There are a few things I've noticed with the Sabina. The weaving area between the beater and the breast beam is much larger than I'm accustomed to, so I have to reach further to throw the shuttle.  Interesting! However, I don't have to wind the cloth off quite as often. The beater can accomodate a 45" reed, so it's much larger and being made of cherry, much heavier than I'm accustomed to. I have to be careful not to pack the weft down too hard.

But it is wonderful to see the old girl weaving again. I wonder what she thinks, back to doing what she was meant to do.

Sunday, January 9, 2011

The Loom Comes Alive

The Newly Restored Sabina and Me


Sabina Loom Before Restoration
Late in December we were given a 45" Sabina Folding Loom.  We knew nothing about Sabina looms and really didn't need a third floor loom!  But George cannot resist a restoration challenge, so we took it in and he started to work.  In working with it, it became apparent that the loom had been stored for at least part of its life in a barn, maybe?  Maybe a garage.  Anyway, the metal was so rusted that none of it could be used.  The wood was dry and rough. Holes were filled with insect nests.

Sabina looms are insteresting.  As nearly as we can figure out, the looms were built in a small workshop in Wilmington, Ohio from the 1930's to 1949.  They do fold, although not the way modern looms fold. Side beams pivot on the castle.  The warp beam, sectional warp beam and back beam are on one side of the side beams and the cloth beam and breast beam are on the other.  Diagonal wooden rods brace the side beams in a horizontal position for weaving.  The beater assembly and treadle assembly both remove and can be stacked against the castle. Pieces lock in place with screen door hooks.

Sabinas are rising shed looms, but don't use the jack mechanism that most modern rising shed looms use. Instead of the treadle causing a scissor mechanism to raise the harness or harnesses, the Sabinas use a system of pullies and chains to raise the harnesses from above.  This causes many people, myself included, to think they're counterbalance or countermarche looms.

An internet search didn't turn up many clues about the Sabina or its provenance. They are around and there are usually a few for sale on eBay or other sales sites at any given time.  But trying to find plans, instructions or even contemporary photos of them isn't as easy as one would hope.  Eventually, George did track down information about the owners of the company.  He even found a Google maps photo of  the house and workshop which are apparently still intact. He's gotten in touch with another man who is restoring a Sabina and they've compared notes. He's found very little, though, in the way of documentation.  After having restored various antique spinning wheels, he's accustomed to letting the wood talk to him.  The Sabina didn't fail.

Sabina before dismantling
He started by carefully photographing the loom as he took it apart. The photographs would serve as the guide to reassembly. The rusted metal bolts and chain were removed and measured for replacement. The old reed and heddles were discarded and new ones ordered.  Each piece was sanded smooth and received a coat of our favorite finishing wax.  As soon as he put a coat of Ashford spinning wheel wax on it, the wood came to life.  It's a beautifully aged cherry. He used brass hardware in places that shouldn't receive much stress. Steel hardware was used where strength is critical.  The steel was ink-dyed to blend with the cherry wood and brass hardware.

After a wrestle with our consciences, we chose to use Texsolv loom cord to replace the metal chains used to raise the harnesses. The Texsolv cord is by no means period, but it should be easier on the cherry pulley wheels and should be much lighter and quieter in operation. I've become a fan of using the Texsolv cord for apron cords. They came standard on my Schacht Baby Wolf loom. After rescuing Calliope from almost hanging herself in the tie-up cords on the older Schacht Standard loom, I've decided to replace the old cording there with Texsolv cord as well.

We ordered a new 15-dent reed and 400 new inserted-eye heddles as well as the Texsolv cord from Woolery.  I'll probably order at least 400 more heddles and at least one more reed.  She can use the Schacht reeds, but they look kind of silly in a beater meant to accomodate a 45" reed.

Warping the Restored Sabina
I have a project all picked out to weave as a gift for my friend who gave us the loom. At only 17.5 inches wide, it will look silly in a 45" loom, but that's not important.  What's important is seeing the old girl back to doing what she was designed to do.

I can hardly wait!

Friday, December 31, 2010

A Kitten Christmas, Finished Projects and Learning a New Technique

Christmas is over and we're in the quiet week between Christmas and New Years. This year has been one of making new traditions and temporarily setting old ones aside.  Because we have two kittens in residence, putting the delicate blown glass ornaments on the tree wasn't an option.  This is the first year in many, many years that I haven't been able to put my beloved ornaments on the tree, nor could I use the new ones I bought earlier this year.  Ah well, there's always next year! We opted for a (shudder!) artificial tree this year, decorated with large bows and unbreakable gold ornaments.  The kittens regarded the tree from the beginning as their playground and have spent quite a bit of time up in the branches.  They've knocked off ornaments and bows. But they're so darn cute that we couldn't get angry with them.
Myst in the Tree
See what I mean?

We did add two new traditions to the mix.  I've always loved the tradition of putting candles in the windows at Christmas.  Several years ago I visited Frederick, Maryland at Christmastime. I finished my work early and took the opportunity to visit the historic district. For December, the weather was mild and the walking tour was fun. Several of the oldest houses had the candles in the windows.  Beautiful!  Just before Christmas, I found some battery-powered LED candles that come with suction cups.  They can sit on the bottom window frame and hold on to the window.  They're wonderful!  They also flicker, so they look a bit spastic, but I love them.  I also love that they have embedded timers, so they turn themselves on and off autmatically.

Byzantine ATC's for the Tree


I was bemoaning the no-delicate-ornament situation to my son who replied that since we're artists, we'll think of something.  And he was right. I decided to start a tradition of making a few ATC's for the tree. Friends can have one... but only if they bring one for trade! Thus far, it was a bust. Joseph was going to make some, but he didn't get around to it. Mom opted out this year. But I made five more Byzantine cards for the Christmas tree and they looked lovely... when they weren't being knocked off the tree.  But they survived.  At least four of them did. I assume I'll find the fifth one when we take the tree down.


Finished Projects
I managed to finish several projects.  Obviously I have oodles more to go, but I'm happy for what I've gotten done.

George's Fingerless Gloves
Well, I didn't make it by Christmas, but I only missed it by one day.  I finished the gloves on the 26th and cast on for the caps the same day.  But at least these are wearable... just in time for the weather to warm up.  Ah well. There's plenty of time for it to get cold again.

The Aran Sweater
The Aran Sweater
And not that I want to suggest that the world might be coming to an end or anything, but I finally finished the Aran sweater!  It's been on the needles for years.  It's finally off the needles!  Finishing it was a pain, but I'm so glad I can finally wear it... just in time for the weather to warm up!  It's very warm and snuggly.

I steam-blocked the seams and cables.  This is the first time I've had the courage to try steam-blocking.  I like it very much for thicker things like sweaters.  Probably fine lace will still be damp-blocked.  If I do much more steam-blocking I'm going to need a garment steamer, but the steam iron does nicely for now.

ATC's and Encaustic
Again, I've been putting off doing January's ATC's.  It's not so much being stubborn as being very busy. 
January's themes are "Inspired by Color" and "Make Your Own Background."  Weeellll.... I frequently make my own backgrounds these days.  I'm getting more comfortable with acrylic paints and am rather enjoying them.  But I've been tempted by encaustics.  Encaustic is an ancient Greek style of painting.  Ground pigments are mixed with beeswax and damar resin.  The paint must be worked  hot, but when it cools, it's very tough. I've put off and put off buying some starter paints and tools and getting going with it.  But George gave me some paints and tools for Christmas, so my excuses are running thin. So yesterday, I plugged in the hot plate, melted paint in an old muffin tin and got out the natural-bristle brushes.  Eight cards later, I at least had the theme done!
Encaustic Village Group
I did these on a sticky-back canvas card, which I probably won't do again.  Next time I think I'll try watercolor paper cards.  But these worked.  The background was done in white, cobalt blue, and an ochre color I made with cadmium yellow and a dark brown.  (Didn't have yellow ochre paint.) The village scene was torn from a cocktail napkin and embedded in the wax. I made every beginner's mistake in the book, but I'm kind of excited about it.  It's far more time-consuming than acrylic or even watercolor, but it has its compensations. The smell of the beeswax is lovely!  None of the cards is a miracle of technical perfection, but they all have a charm of their own.

Encaustic Village Detail

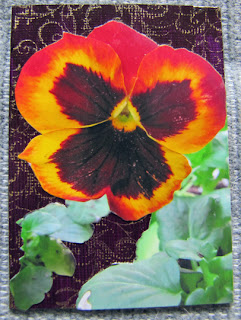
"There's pansies, that's for thoughts."

Inspired by Color has been fun.  With the weather overcast and as gloomy as it sometimes gets around here, I've been longing for color.  Pansies are a cheerful flower that can tolerate the cold.  So we bought lots of pansies when we bought the window candles.  I planted them in windowboxes and set them on the walkway.  I also put some in the "kitten pot" - the flowerpot that the kittens slept in when they were tugging on our heartstrings and finding themselves a home.  I bought as many different colors as I could.  I love them all, but my favorite is a "monkey-face" large pansy with a brown-ish purple center surrounded by gold and red.  I like to think this card is a mixed-media project of gardening, photography, acrylic painting and stamping!

Another Year
So what will next year bring? More learning techniques in all media. More weaving. I love to weave, but I don't get around to it all that often. George is about to finish the antique Sabina loom and I'm excited about getting a shawl woven on it. I have all kinds of things I want to do in 2011. I want to get this weight off. It's affecting my health and that's not good. I want to spend more time outdoors and on the boat. We'll see what comes my way! A very happy and productive New Year to all my friends and family and to those that may read this blog, but who I never know or meet!
Monday, December 6, 2010

The ATC's That Won't

Byzantine Retro
Some days it's just not worth getting up in the morning.  I'm only participating in one ATC swap this month: Retro Christmas.  I thought about making a 50's-looking card, but an icon I found called out to me.  I decided to go for a Byzantine look. I wanted the card to appear old with the paint somewhat peeling, so I decided to use Tim Holtz's crackle paint.  This is the first time I've used crackle paint.  What I don't know about crackle paint would fill volumes, apparently.  Here are the steps I used to make the cards:
  1. Paint an acrylic canvas ATC with gold arcylic paint. Let dry.
  2. Glue on the icon image. Let it dry.
  3. Gold leaf the halos around each member of the Holy Family. Let it dry.
  4. Apply clear crackle paint and let it dry.
  5. Panic
Maybe I read the instructions wrong, but they said to apply a thick coat of crackle paint. For reasons unknown to me, the crackle paint cracked all right, and lifted the ink off the icon image with it. In areas where I used little paint, the cracking is really pretty.  That would be one or two of the cards.  The rest cracked way too much, varying from a little too much to "I can rub the entire image off the card" too much.  Lesson learned: Use crackle paint sparingly, at least over a printed image.  I need further experimentation to see just how it works with various media.

I intended to varnish the cards anyway to protect them, but this morning it became a "glue the 'paint chips' back on" exercise. After two coats of varnish, gluing chips back on where necessary and possible, I think I have 9 finished cards.  I won't say they're all good.  Far from it!  But they're passable, if somewhat delicate.
Byzantine Retro ATC card detail

Phinished Phiberwork Projects
I've finished quite a few knitting projects, and one crochet project that I'm very happy about.  I've hated crochet for years.  It makes my hands sore and my gauge is a nightmare.  Working at the shop, however, has been a wonderful thing.  Crochet designer, Linda Permann works there.  Although we usually trade days - I'm there when she isn't - she and I found ourselves working together for a week.  During that week, not only did she take the time to correct many of my mistakes, she helped me find patterns and yarns.  In some ways, I now like crocheting better than knitting.  I can design as I go more easily in crocheting than knitting.  No, I'm not abandoning knitting, nor can I ever see myself doing so, but I'm getting to really like crocheting.  So without further ado, here is my first post-Linda project, the Cardiff Cowl from Lion Brand Yarns.

Cardiff Cowl Detail
The pattern is reasonably easy, very pretty and only took one skein of Mirasol Nuna.  I bought two skeins, thinking I'd need both.  The cowl came in a few yards under a single skein.  I decided to make a knitted cowl from the second skein.  George found me a lovely feather-and-fan (Old Shale, Print o' the Wave) and cabled pattern, so that's what I used.  And here it is!

Feather Cabled Cowl

And fresh from the needles of a girl who hates doing colorwork, here are two versions of the Argyle hat from Crystal Palace yarns.  Both are made with a solid color of Merino 5 and a handpaint in Mochi Plus.  The first is my hat with the variegated on cream.

My Argyle hat

The second is a more intense rainbow yarn against black.  Honestly, I like this one even better than the first one.  However, I promised this hat to George and he won't give it back!

George's Argyle Hat

More Projects??

But I have to start more socks, don't I?? I think I only have five pairs going just now. Here are the latest, a simple sock made to show off the Footprints yarns I have. The set includes handpaint yarn for the body of the sock and a smaller amount of a coordinating tonal yarn for the toes and heels. I'm hoping I'll have enought for the cuff at the top of the sock. I'm using the Upstream master pattern from Cat Bordhi's New Pathways book.

And last, but not least, I've started a pair of fingerless mitts for George.  These will have detachable covers for his fingers so he can choose whether to have more dexterity, but colder fingers or warm fingers and less dexterity.  I just cast these on yesterday, so they're not far along yet.

George's Fingerless Mitts
It's been a busy time! Of course, there's much more going on, but this is a start.  One of these days, I'll get this blogging thing working better and post less in one post, but more frequent posts.  Someday...

Tuesday, November 2, 2010

New ATC's

Ah, it's ATC (Artist Trading Card) time in the ol' town tonight.  I squeaked these in under the wire.  What with the polymer clay shrines, working at the yarn shop, designing knitted stuff and everything else in my life, I put off making the cards until the weekend before the swap.  Oops!

Actually, I'm glad I did.  The themes this month were Flying Things and Steampunk.  This time, I thought they'd both be easy.  Wrong!  But... Last week I had a chance to attend a class taught by Susan Pickering Rothamel.  She used techniques and media that I've never worked with before and was, frankly, a little scared to try. When I got home, I wanted to practice the techniques before I had a chance to forget, but the two kittens decided to join us that evening and the studio had to wait. I had to work Saturday, but on Sunday, I took my courage firmly in hand and decided to tackle a technique I'd never tried before to produce seven Flying Things ATC's.  I've never been known for sense.

And here they are!

Leaves Fly, Too
 Each is a little different.  They're each based around a Japanese postage stamp with a bird (flying thing) on it. Because I love this time of year, I wanted to use fall themes and colors.  So...  I started with an acrylic underpainting in fall colors. I adhered the postage stamp to the middle of the card and a black-paper cutout of tree branches on top.  Then I adhered maple leaf motfs from paper napkins and overpainted them with acrylics. After the whole thing dried, I embellished the leaves with irridescent paints.  A coat of sealer and they were done!  Here is a detail of one of my favorites:

Leaves Fly, Too Detail
The Steampunk card should have been easy.  I have two kids who thoroughly understand Steampunk.  I did a memory book for my son that was totally Steampunk.  I get this concept.  And maybe I'm getting a little tired of it.  But a thought kept niggling at me.  How about a totally Steampunk card, complete with a mechanized view of life, with a little bit of color and nature and light?  So I took a stamp I dearly love, a woman made of clock faces, found two Steampunk backgrounds, and found a gorgeous butterfly from a Dover clipart book.  I stamped the woman onto a shaded, almost flesh-toned paper and embossed her in black to create a sharp, almost harsh image. I cut the image out and adhered it to a dark, paper printed with gears and all that Steampunk sort of stuff and then adhered the butterfly to the card.  I embellished the butterfly with irridescent paints and tiny crystals.  And here it is:
Juxtaposition
I have to say, I'm glad I did the swap.  The one thing about scheduled ATC swaps, it forces me to create art on a schedule.  Now that may seem kind of mechanized and soulless, but let's face it, if Pope Whichever hadn't kept on his case, Michelangelo probably would never have finished the Sistine Chapel!

Sunday, October 31, 2010

New Kitties!

Calliope and Myst

Myst Gives Calliope a Wash
We've been adopted!  Last week I saw three kittens on the deck.  Two were calicos and one was grey and white.  When I went out to investigate further, I saw a large calico cat run off the deck.  The darker calico tried to follow, but the mama (so I assume) swatted her away. One calico was darker, one was mixed with white like the mama and I couldn't determine whether the grey and white cat was male or female  He/she was the shyest of the three. 

Against my better judgement, I brought the kittens some dry food.  They ate it down like they were starving.  After their meal, they scampered off the deck and disappeared.  I assumed they were littermates and the large calico was their mother.  I'd never seen the mama or babies before, which means absolutely nothing.  There is another neighborhood bordering ours and a certain amount of undeveloped area, so animals come and go.  I was concerned for the kitties, though.  There is a busy street bordering our neighborhood and quite a variety of predators around, including red-tail hawks. Although our neighborhood is quiet, the area isn't all that safe for young animals.

That night, I peeked out on the deck and there were the kittens, curled up in an empty plant pot on the deck table.  I left them to sleep.  The next morning I looked out and they had already gone.  But that night they were back again.  Or so I thought.  I took them more food and discovered that only the darker calico and the grey and white were in the bowl.  I haven't seen the lighter calico since the first day nor have I seen the mama cat.  We decided to take the two kittens in, but keep them in solitary confinement until we knew more about them.  We discussed taking them to SCAT - the local cat rescue association, but I just couldn't do it.

We took them to the vet Friday morning and had them checked over.  They each received a clean bill of health and got their first round of vaccinations.  We brought them home and introduced them to Ming.  He's not all that pleased, but there's been a remarkable absence of hissing and spitting.

After a family discussion - that being two hours on the phone with my daughter at college - we named the calico Calliope and the grey and white kitty Myst.  Calliope is Greek for "beautiful voice" and it fits her. She talks more and louder than our resident Siamese!  Calliope was also Homer's muse for the Odyssey.  Myst fits the grey and white kitty as she's a little more retiring and slips in and out like a mist.

So Myst and Calliope have joined Ming Miao as the resident rulers of the household.  For the most part, they're getting along.  Ming is just beginning to think about playing with the interlopers.  At least he hasn't attacked them!
And I did manage to get two Cat Nap Mats crocheted for them!

Wednesday, October 27, 2010

Finished Socks, Started Socks

George's Philosopher's House Socks

George's Philospher's House Socks - Take 2
I finally finished the second version of Cat Bordhi's Philosopher's House socks for George.  He went through the first pair I made for him in about a week, so I repurposed a semi-felted aran-weight yarn into replacements.  The yarn was a bit too thick and stiff to work on size 5 needles, but I did it anyway.  The yardage was a bit short for the complete cuff, so these are about six rows too short.  However, they fit and George loves them and that's all that counts!  I have two more skeins that could become socks for him as well, but it might be awhile before I tackle that yarn again!

Quiet Evening Socks


Quiet Evening Socks - in progress
 I'm sure there's some reason why I need to cast on a pair of socks as soon as I finish another pair.  Even though I have plenty of other work on the needles, I just seem to have this insane drive to KNIT!  These socks were in the latest issue of Creative Knitting.  It's not like I need another sock pattern or a lesson on knitting toe-up.  I've been doing that for quite some while now.  And I'm going to change this pattern anyway and use one of Cat Bordhi's arch expansion / heel choices.  But there's something about the colors and the name.  It reminds me of Carly Simon's song of the same name.  This is a simple lace pattern that's easy to remember and rhythmic to knit.

Back to the Artist Trading Cards
Maybe I'm knitting to avoid making the next round of ATC's that's due next week.  I can't figure out how to do what I want to do and it's frustrating me.  I've noticed a strong tendency to do something else when I don't want to do what I know I should do!  So I'd better get busy and do what I know I should.  It'll make me much happier.